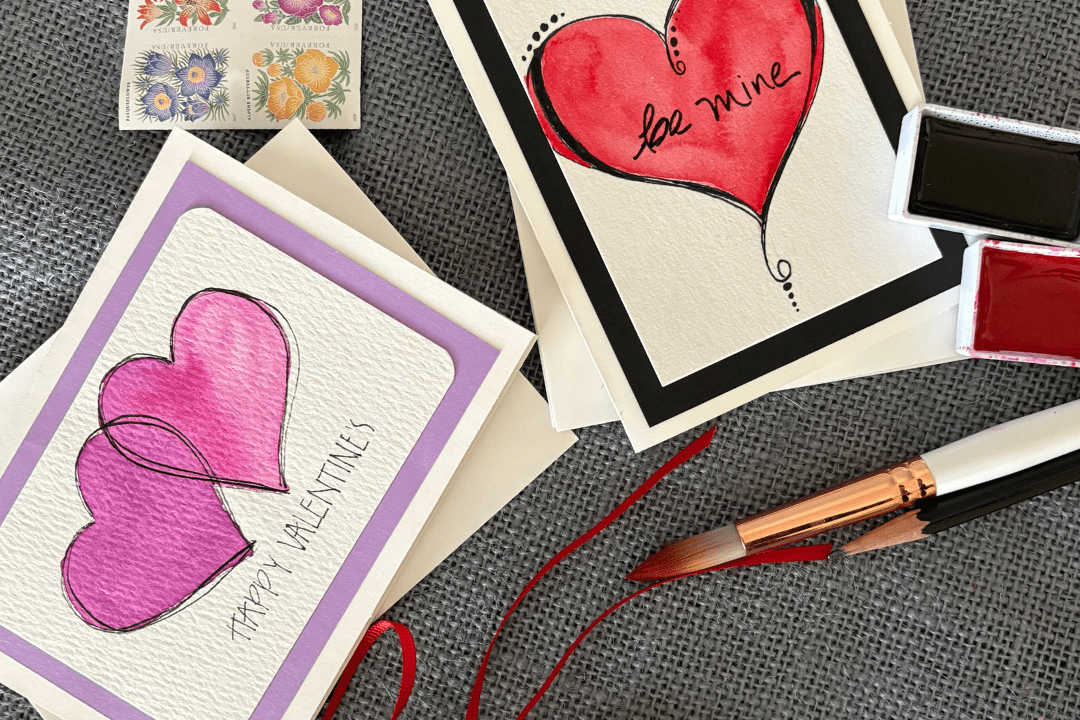
Tired of gifting the same grocery store flowers, Hallmark cards and Russell Stover chocolates every Valentine’s Day? This season, step outside the box and create something special your loved ones will truly cherish. Here, Northern Colorado artists and makers share handmade valentine tutorials to help you craft the perfect gift.
DIY Valentine’s Day tutorials below:
1. Heart Envelope Card, 2. Handmade Ribbon Card, 3. Stamped Valentine’s Day Card, 4. Watercolor Valentine’s Day Card,
5. Local Maker Gift Box, 6. Upcycled Candle Jars
Kelsey McDonald, Viola and Beatrice Stationers
In today’s world of digital communication, receiving something handmade or handwritten feels truly special, says Kelsey McDonald, owner of Viola and Beatrice Stationers in Fort Collins. She’s perfected the art of blending beauty and meaning through her handcrafted holiday cards, notebooks, stationary kits and custom design services.

Heart envelope card by Viola and Beatrice Stationers.
“When you take the time to create or write something by hand, you’re giving a gift that reflects your care, attention and thoughtfulness,” she says. “Adding special touches—whether it’s a handwritten note, drawing, photo or meaningful trinket—makes the valentine uniquely yours. These small details carry a sentiment that can’t be replicated in a mass-produced card.”
Tutorial #1: Heart Envelope Card
Materials:
• Paper (8.5 x 11 inches or larger). Any paper works, but for best results, choose something between text and cover weight for easy folding.
• Scissors or a craft knife to cut out your heart shape.
• Template (printable template or one from Canva). Use this for the heart shape.
• Ruler to help you with straight lines when measuring and cutting.
• Creasing tool or bone folder for crisp, clean folds. You can use a bone folder or just use your fingers if you don’t have one.
Optional materials:
• Decorative paper or cardstock. Use patterned, textured or colored paper to give your envelope a personal touch.
• Stickers or washi tape for extra decoration and flair.
• Markers, pens or stamps to add drawings, designs or messages directly onto the heart or envelope.
• Confetti, glitter or tiny trinkets. These add fun details inside the heart envelope for a surprise when it’s opened.
• Wax seal or decorative stickers for sealing the envelope with a touch of elegance or personal charm.
• A1 or RSVP envelope to mail your heart-shaped envelope if desired.
Instructions:
- Print out or copy the template. If you want to get creative, use the Canva link to add text, images or personal touches.
- Choose the paper you’d like to use for your large heart envelope. Your paper should be at least 8.5 x 11 inches. Any paper works; just make sure it’s somewhere between text and cover weight since you’ll be folding it.
- Decide whether to cut or design first. You can either cut/fold and then decorate or design and then cut/fold—whatever works best for you. If you’re using patterned paper, fold it in half (4.25 x 11 inches). Fold your template in half too, and place the patterned paper inside the folded template with the folded edges together. Cut along the dotted line to keep your heart symmetrical.
- Once cut, lay your heart flat, with the patterned (or outside) side facing down.
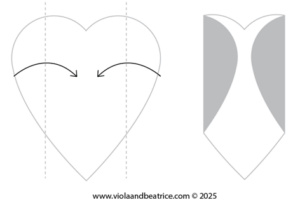
- Fold the outside curves of the heart in, almost to the middle, and crease the edges for a clean fold.
- Fold the top down just above the middle, or to the point where the bottom corner of the first fold meets.
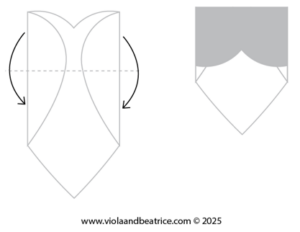
- Now fold the point of the heart up to create the envelope shape.
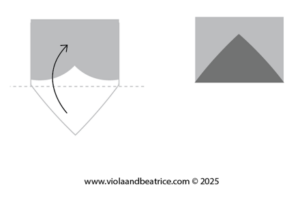
- Turn the envelope so the flap is at the top, ready to be filled.
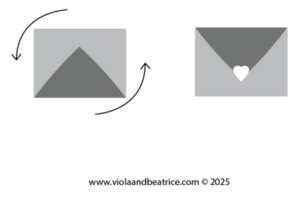
- Fill your heart. Write a sweet note, add trinkets, mementos, stickers, confetti—anything small and delightful that fits inside your envelope.
- Once your heart is filled, seal it with a sticker or wax seal. Your heart envelope fits perfectly inside an A1 or RSVP envelope for mailing. At this size, it’s not large enough to mail on its own, but it’s great for a cute little surprise in a bigger envelope.
Cordelia Elise
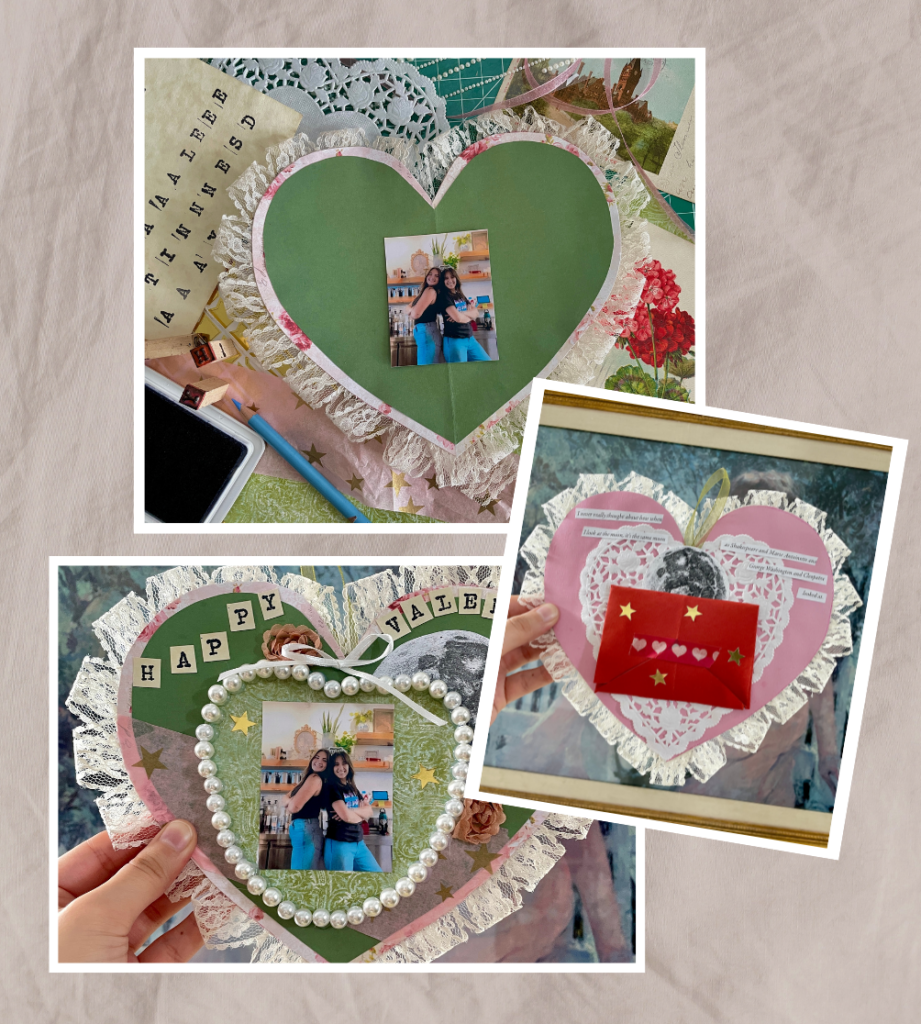
Handmade ribbon card by Cordelia Elise.
“The best thing about a handcrafted gift is that it’s made with love,” says Cordelia Elise, a Milliken artist who specializes in acrylic gouache, digital illustrations and colored pencil art. “A few of my favorite things to include in a DIY gift are photographs, handwritten notes or inside jokes and a [practical] use for their gift, whether it’s for decor, a personal keepsake or something that they might even be able to use on the go. You can make a DIY gift that will be cherished as a keepsake by blending personal details, creativity, a meaningful message and, of course, a little bit of fun.”
Tutorial #2: Handmade Ribbon Card
Materials:
• Three pieces of cardstock paper
• Mod Podge or Elmer’s glue
• Hot glue and hot glue gun
• Pencil
• Scissors
• Ribbon
• Washi tape
• Decorations: glitter, photographs, pressed flowers, stamps, beads, doily, etc.
Instructions:
- Fold three pieces of cardstock in half, then draw half a heart on the spine of one of the folded papers lightly with a pencil.
- Using scissors, cut out the heart you just drew. Use this folded heart as a template to trace on the two other pieces of cardstock.
- Take the heart you want to use for the back of the card and lay it flat.
- Cut a few three-inch strips of ribbon. Paste one edge of one ribbon at the top right side of the heart with Mod Podge or Elmer’s glue. Fold the ribbon over and angle it slightly to follow the shape of the heart, then paste the other edge down. Repeat this until you get to the tip of the heart (you’ll glue the lace to the tip of the heart later).
- Glue the lace to the left side of the heart and paste the edge of the ribbon down, flipping it the opposite way.
- For the tip of the heart, take one piece of lace and fold it in half, gluing the edges to look like the rest of the lace. You can also create a loop with another type of ribbon and glue it to the top of the heart to give the recipient the option to hang your card on the wall as decor.
- Attach the heart you wish to use for the front of the card by smearing Mod Podge or glue on the same side of the card the lace is glued to. Allow a few minutes for the glue to dry once attached.
- While you wait for the card to dry, grab the third heart and fold the sides of the heart to meet the middle, making sure the edge you fold is straight. Fold the top of the heart down, then fold the tip of the heart in to make a cute envelope.
- Open the envelope you just made and place it on the backside of your card. Line the hearts up, then fold your envelope closed again. It should look like the envelope is upside down. Trace the shape of the closed envelope so that your placement is perfect. Smear Mod Podge on the back of the envelope and place it in the spot you traced. Allow time for it to dry.
- Now it’s time to decorate. The card photographed above has large beads, star stickers, ribbon, tissue paper, magazine clippings and a photograph. Hot glue was used for the bulkier items (like the large beads), and Mod Podge was used for the delicate items (like the magazine clippings). The envelope has a message written and pasted on paper the same size as the rectangle indent of the envelope and was glued inside the envelope. Washi tape was used to seal the envelope, but you can also use a wax seal for a more decorative option.
Johanna Mueller, Johanna Mueller Prints
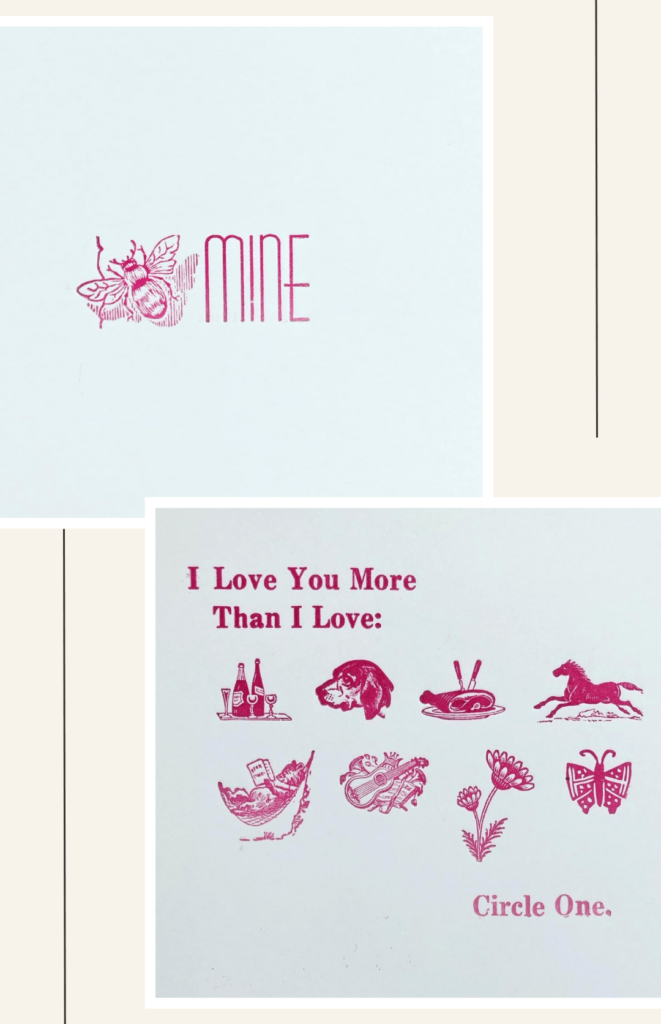
Two hand-printed Valentine’s Day cards by Johanna Mueller.
Greeley printmaker Johanna Mueller creates traditional hand-pulled prints with detailed engravings, hand-carving each image and rolling it with ink before sending it through her printing press. She uses a letterpress in her card-making classes, one of which will take place from 5:30-7:30 p.m. on Feb. 13 at Wonderhand Studios in Greeley.
Mueller finds inspiration for her unique Valentine’s Day cards by scouring the internet and her collection of poetry books for love quotes. While she works with a letterpress, she says anyone can create something similar with a set of alphabet stamps at home.
“When working with letterpress, you are limited to the type and ornaments in the collection, so it is so important to be creative with what you have,” she says. “For example, instead of saying ‘Be Mine,’ you could use a little bee insect drawing or sticker, or in the case of letterpress, the bee ornament to create a more visual message.”
Tutorial #3: Stamped Valentine’s Day Card
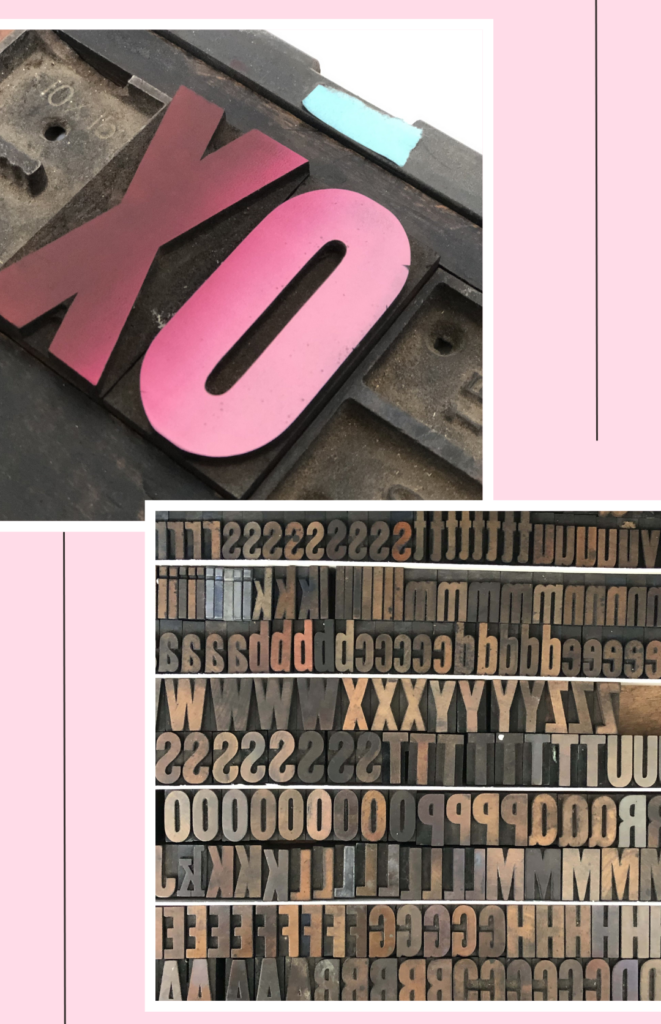
Johanna Mueller’s stamps.
Materials:
• Rubber stamp alphabets. These can be found at any craft store or ordered online.
• Stamp pads in a variety of colors.
Instructions:
- Find a quote that you love—or one that shows your love.
- Do a practice round of letter stamping to show how long the phrase will be. Continue stamping until you have the correct spacing for the size of your card.
- Place your practice stamping just below where your actual placement will be so that it will act as a guide for where to place each letter.
- Stamp your card with firm (but not too hard) pressure so that the edges of the rubber stamp do not print.
- Add stickers, a watercolor border or maybe a line of glue and glitter underneath the most important part of your phrase.
D’Lane Joens, Gratitudes by D’Lane
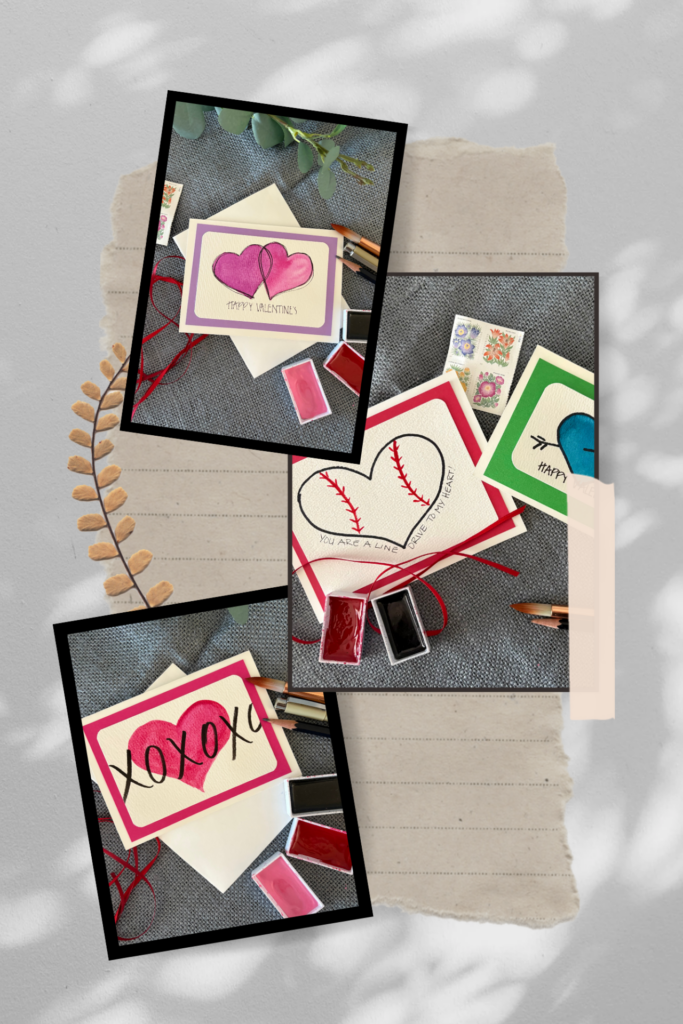
Watercolor cards by D’Lane Joens.
Kersey artist D’Lane Joens makes one-of-a-kind watercolor cards and teaches watercolor classes at Makers Mercantile & Studio in Greeley. For her, Valentine’s Day cards are a way to show appreciation for someone special, whether that’s a friend, partner or colleague.
“By tailoring the card to reflect your unique relationship, you make it personal and meaningful,” she says. “Incorporating design elements, like photos, quotes, symbols, special colors or drawings of shared experiences, enhances your message.”
Tutorial #4: Watercolor Valentine’s Day Card
Materials:
- Card (construction paper, card stock or blank card)
- Watercolor paints
- Paintbrush
- Water
- Markers (assorted colors)
- Glue
- Optional: heart-shaped cookie cutters, photos, glitter, sequins, lace, construction paper, stickers and stamps.
Instructions:
- Think about the recipient. Consider who you’re making the card for and how you want to make it special. This will help guide your design.
- Prepare the card by cutting your paper or cardstock to the size you want, then fold it in half to create a folded card. You can also use a prepared blank card.
- Using heart-shaped cookie cutters as templates, lightly trace the hearts onto the card with a pencil.
- Select a color of watercolor paint, activate it with water and carefully paint inside the heart shapes.
- Allow your painted design to dry completely before continuing.
- Use markers to outline the heart, and write your message or quote on the card. You can also add extra decorations such as photos, glitter, lace, stickers or stamps.
- Sign the card, and it’s ready to deliver.
Additional ideas:
- Embellish with glitter and sequins to make it sparkle.
- After painting a word or heart, grab your favorite pens and pencils and doodle fun designs on it.
- For sports fans, make the heart into a baseball, football or volleyball with markers.
- Once your paint is dry, stamp over it for a instant background.
- Use the person’s favorite color and paint the heart that color. Blue and green hearts will catch their attention.
- Add quotes, words of encouragement or Bible verses that resonate with the recipient.
- For young artists, stickers are a great way to add a personal touch.
Melissa Mika and Beth Kopp, Makerfolk
Makerfolk, a downtown Fort Collins makerspace inside Bean Cycle Roasters’ new location (326 Walnut St.), is full of handmade decor, candles, stationary and more. Here, PAGEFIFTYFIVE printmaking shop owner Melissa Mika and Beldamia candlemaker Beth Kopp share their tips for putting together a maker gift box and upcycling candle jars to hold plants and flowers.
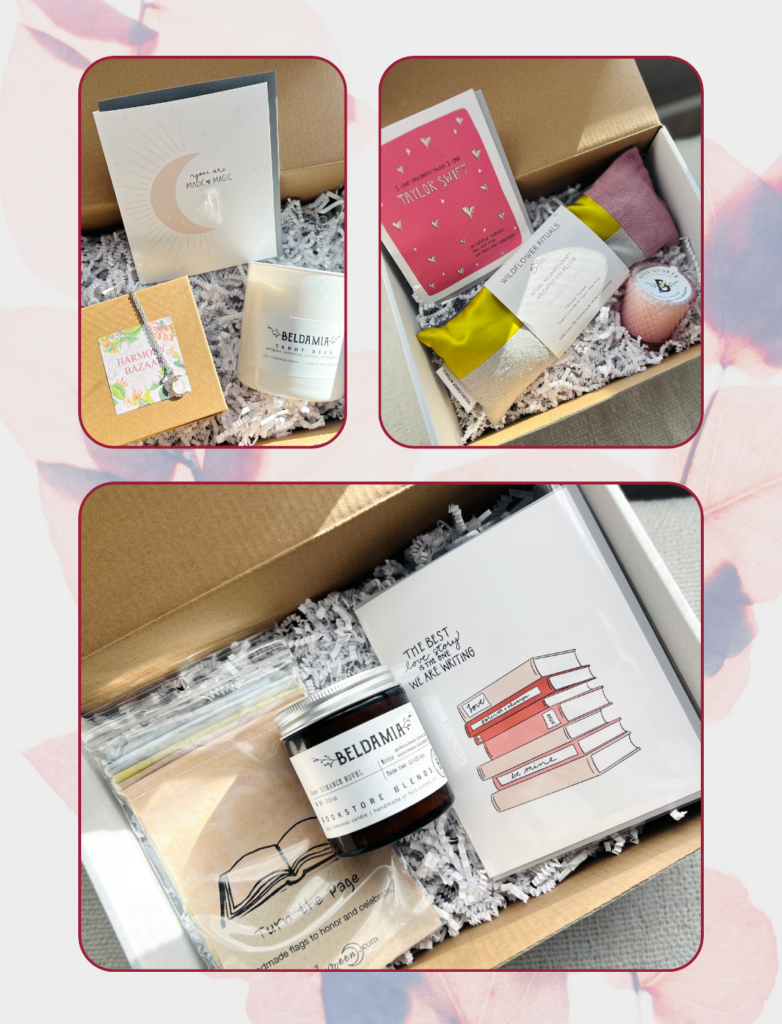
Local gift boxes by Makerfolk.
“Not only are handmade gifts always a hit, but supporting local businesses is the best way to show your community some love this Valentine’s Day,” Mika says.
Tutorial #5: Local Maker Gift Box
Instructions:
- Pick a theme. Try curating gift boxes around a specific color or something fun that you know the recipient loves, like books or magic.
- Always include a card. Mika’s valentine, galentine and LGBTQIA+ cards are perfect for anyone in your life.
- Add a few gifts that fit the theme, like hand-poured Beldamia candles, Harmony Bazaar jewelry, arubymoon flag sets or Wildflower Rituals’ weighted eye pillows. These products are all made by local makers and can be found at Makerfolk, various shops and boutiques in Fort Collins and local makers markets.
- Arrange the items in a gift box with some filler and tissue paper and present it to your valentine.
Tutorial #6: Upcycled Candle Jars
“At Makerfolk, we believe you never have to throw out a candle jar,” Kopp says. “They can be completely cleaned out and used for flowers and plants to decorate your home or give as a Valentine’s Day gift.”
How to clean candle jars:
- Place the candle jar on a cookie sheet lined with parchment paper and place it in a low-temp oven (200° F or less) until the wax melts.
- Using a dish towel to hold the jar, carefully pour the melted wax into a disposable container.*
- Soak the jar in hot, soapy water until the wick sticker comes loose. You may need to use a butter knife or pliers to completely remove it.
- Wipe the inside of the jar clean with a paper towel.
*Never pour melted wax down your sink drain.
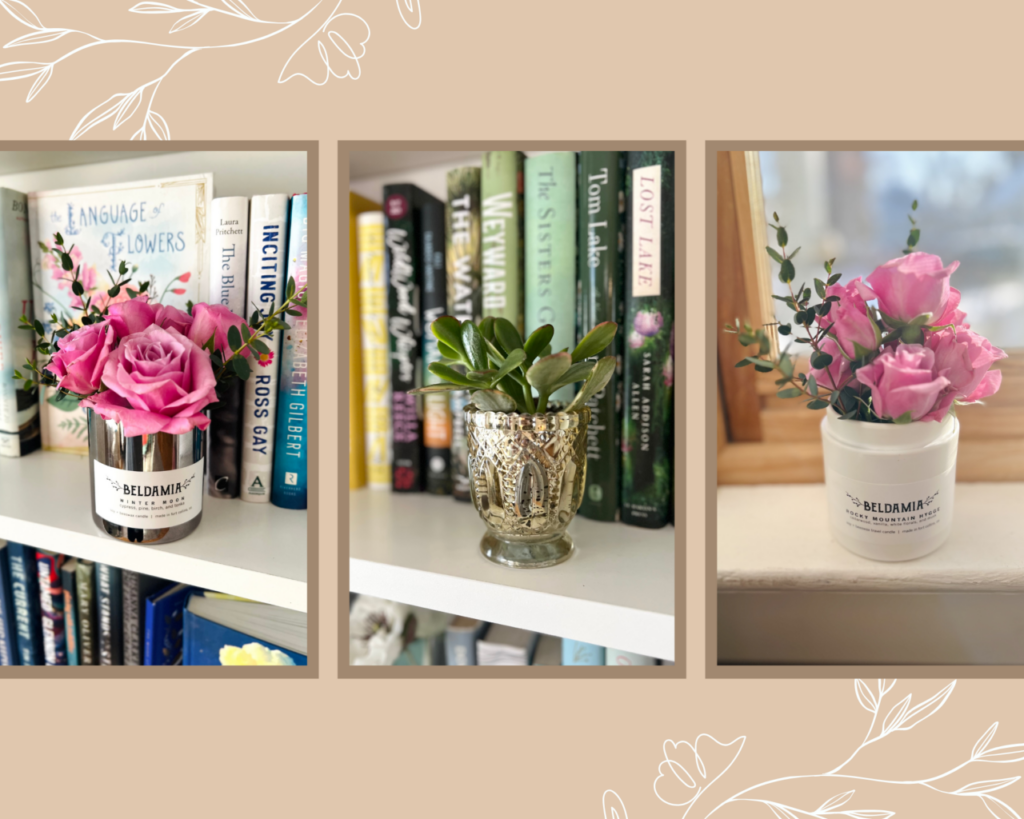
Upcycled candle jars by Makerfolk.
Choosing flowers and plants:
• If you’re on a budget, Trader Joe’s has the best deals on flowers and greenery. Makerfolk used spray roses and eucalyptus to fill the empty jars pictured here.
• If you’re able to support local flower shops, check out CC’s Flowers or Paul Wood Florist in Old Town. Both sell blooms and greenery by the stem.
• For these shorter bouquets, you will need around six flowers and will want to cut your flowers between 4.5 and 6 inches long. Place the shorter flowers around the edge and the taller ones in the middle. Add a few sprigs of greenery to finish.
• You can find succulents at Kansas City Kitty or Paul Wood Florist in Old Town. Put some small stones at the bottom of your jar to help with drainage and fill it with cactus/succulent soil mix. Plant your succulent, water it and keep in a bright spot in your home.
Tips for Personalizing Valentine’s Day Card Messages
For those who aren’t sure what to write on their Valentine’s Day card, McDonald offers the following prompts.
For friends:
• To show your appreciation, think about one thing you’ve always admired about the friendship. What does this person do that brightens your day? Write a note letting them know.
• To make a lighthearted and fun card, think about a shared experience or favorite memory from your friendship to write about.
For new relationships:
• To convey excitement, recall a memory from the first time you met. Write a note about the excitement of getting to know them better.
• To show affection and growth, ask yourself, “Even though the relationship is still new, what excites you about the future together?” Write a note expressing how you see the potential for growth and what you can’t wait to experience together.
For long-term relationships:
• To show deep affection, reflect on a time you’ve shared together. What’s one of your favorite memories that you’ll cherish forever? Write a note expressing your love and gratitude for your shared experiences.
• To express excitement about continuing the journey, think about the years you’ve spent together and the future ahead. What’s one thing you’re excited to continue building in your relationship? Write a note about how you’re looking forward to the next chapters together.


